
Instructies om te zorgen dat onze mail niet in een spambox komt
Vaak is het al voldoende om onze e-mailadressen maw@altwolff.nl en woltink@xs4all.nl in je contacten- of adressenlijst te zetten.
Doe dat in ieder geval eerst.
Maak er een gewoonte van om regelmatig ook je spambox/reclamebox/prullenbak te checken, want door de spamfilters wordt soms gewenste post toch als ongewenst weggewerkt.
Maar om er zekerder van te zijn dat onze mail niet in je spambox verdwijnt is het zinnig om onze e-mailadressen ook te ‘whitelisten’ oftewel op een lijst van gewenste e-mail te zetten.
Zie daarvoor onderstaande instructies:
Instructies voor Apple computers
Instructies voor iPhone of iPad
Algemene instructies
1 Open je e-mailprogramma of -service
2 Ga naar de instellingen voor filters of spam:
• Zoek naar een instelling met de naam “Filters”, “Spamfilters” of iets vergelijkbaars.
• In sommige gevallen vind je deze instellingen onder “Opties” of “Instellingen”.
3 Voeg het e-mailadres toe aan de witte lijst:
• Zoek naar een optie om een “Witte lijst” of “Veilige afzenders” te beheren.
• Voeg het e-mailadres toe dat je als gewenst wilt markeren.
• Sla de wijzigingen op.
4 Controleer je spamfolder:
• Controleer of e-mails van het als gewenst gemarkeerde e-mailadres niet langer in je spamfolder belanden.
• Als die nog steeds in de spamfolder of prullenbak belanden, controleer dan de instellingen opnieuw en zorg ervoor dat het e-mailadres correct is toegevoegd.
De exacte stappen kunnen variëren, afhankelijk van het e-mailprogramma of de e-mailservice die je gebruikt.
Raadpleeg de helpsectie van je e-mailprovider voor specifieke instructies, als je hulp nodig hebt bij het vinden van de instellingen voor spamfilters of witte lijsten.
Instructies voor Apple computer of laptop
1 Voeg onze e-mailadressen toe bij onze namen in je Contacten
maw@altwolff.nl
woltink@xs4all.nl
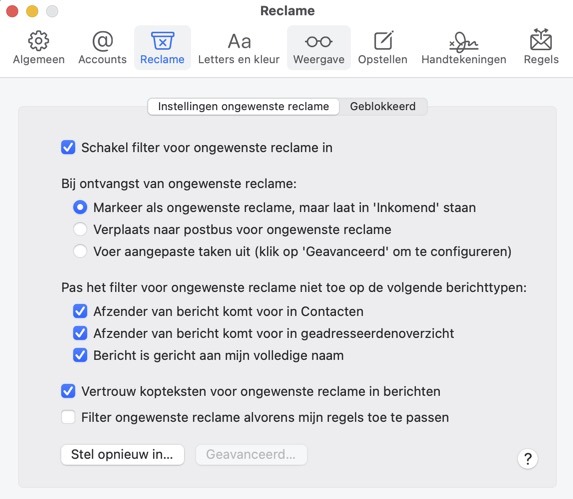
2 Ga in het programma Mail naar > Voorkeuren > Reclame en vink dan aan:
• Schakel filter voor ongewenste reclame in
• Pas het filter niet toe als: Afzender van bericht komt voor in Contacten
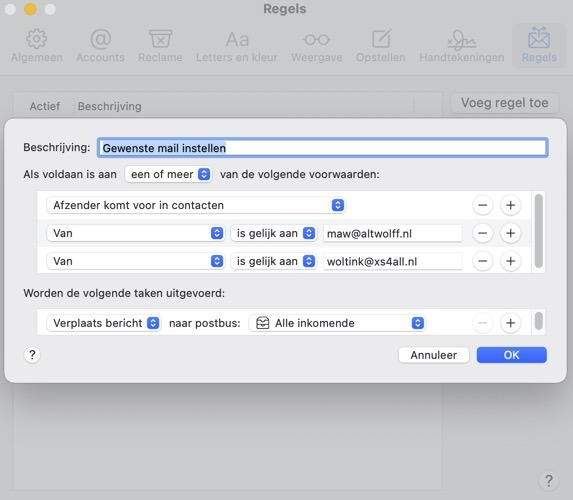
3 Ga in het programma Mail naar > Voorkeuren > Regels en maak daar een nieuwe regel:
> Voeg regel toe
Beschrijving: Gewenste mail instellen
Als voldaan is aan een of meer van de volgende voorwaarden:
• Afzender komt voor in contacten
• Van is gelijk aan maw@altwolff.nl
• Van is gelijk aan woltink@xs4all.nl
Worden de volgende taken uitgevoerd:
• Verplaats bericht naar postbus Inkomend of Alle inkomende
4 Druk op OK
Voor de duidelijkheid hierbij ook twee screenshots van die settings:
Instructies voor iPhone of iPad (mobiel iOS (Apple) apparaat)
Open het betreffende bericht in je spambox > druk op het kromme, naar links wijzende pijltje dat je rechtsonder in beeld hebt en scroll dan naar: Markeer als geen reclame en kies die optie.
Het bericht staat dan weer in je inbox.
Als je daarnaast het e-mailadres hebt toegevoegd aan je contactenlijst dan komen volgende mails van dat adres, als het goed is, niet meer in je spambox.
Instructies voor Gmail
1 e-mail markeren als “Geen spam”
Als een e-mail in de spamfolder is beland, kun je Gmail laten weten dat het geen spam is:
• Ga naar de Spam map (aan de linkerkant van je scherm, je moet mogelijk op “Meer” klikken om deze te zien).
• Selecteer de e-mail(s) die je uit de spamfolder wilt halen.
• Klik bovenaan op de knop Geen spam.
Dit laat Gmail weten dat je dit soort berichten in de toekomst in je inbox wilt ontvangen.
2 De afzender toevoegen aan je contactpersonen
Door de afzender aan je contactpersonen toe te voegen, geeft Gmail aan dat deze afzender vertrouwd is.
• Open de e-mail van de afzender die je als gewenste mail wilt markeren.
• Beweeg je muis over de naam van de afzender.
• Klik op Toevoegen aan contactpersonen in het venster dat verschijnt.
Hiermee verklein je de kans dat e-mails van deze afzender naar de spamfolder worden verplaatst.
3 Maak een filter om berichten altijd in je inbox te laten komen
Je kunt een filter instellen om ervoor te zorgen dat bepaalde e-mails nooit als spam worden gemarkeerd:
• Open Gmail en klik in de zoekbalk op het pijltje omlaag.
• Vul de gegevens in van de afzender of het onderwerp dat je altijd in je inbox wilt ontvangen.
• Klik onderaan het zoekmenu op Filter maken.
• Vink het vakje aan: Nooit naar spam verzenden.
• Klik op Filter maken om het filter toe te passen.
Dit zorgt ervoor dat e-mails die aan deze criteria voldoen altijd in je inbox belanden.
4 Controleer Gmail-instellingen en promoties
Soms belanden e-mails in de spamfolder door bepaalde Gmail-instellingen of vanwege automatische filters zoals “Promoties” en “Updates”. Als je merkt dat normale e-mails ten onrechte in de spam terechtkomen, kun je:
• Kijk onder de tabbladen Promoties of Updates als je ze hebt ingeschakeld. E-mails kunnen daar terechtkomen zonder dat ze daadwerkelijk als spam worden gemarkeerd.
• Je kunt deze tabbladen uitschakelen door naar Instellingen (het tandwiel-icoontje) te gaan, en vervolgens naar Alle instellingen bekijken > Postvak IN. Daar kun je de tabbladen zoals Promoties of Updates uitschakelen als je ze niet nodig hebt.